Obsidian
Connect Obsidian to the LMU AI API — configure the Claudian and Copilot plugins to use Claude and Chinese large models in your notes with no proxy.
Obsidian is a knowledge-management and note-taking app built on local Markdown files, commonly used to build a personal knowledge base, bidirectionally linked notes, and a "second brain." With community plugins, you can call the Claude API directly inside your notes for AI writing, content organization, knowledge-base Q&A, and code generation.
This page covers two popular plugins for connecting to the LMU AI API — pick whichever one fits your needs:
| Plugin | Engine | Best for |
|---|---|---|
| Claudian | Claude Code CLI | Already using Claude Code and want to call an AI agent directly in your notes |
| Copilot | Direct API | Want lightweight chat and knowledge-base Q&A without installing a command-line tool |
Prerequisite: enable community plugins
Both plugins are community plugins, so you need to enable the community-plugins feature before installing them.
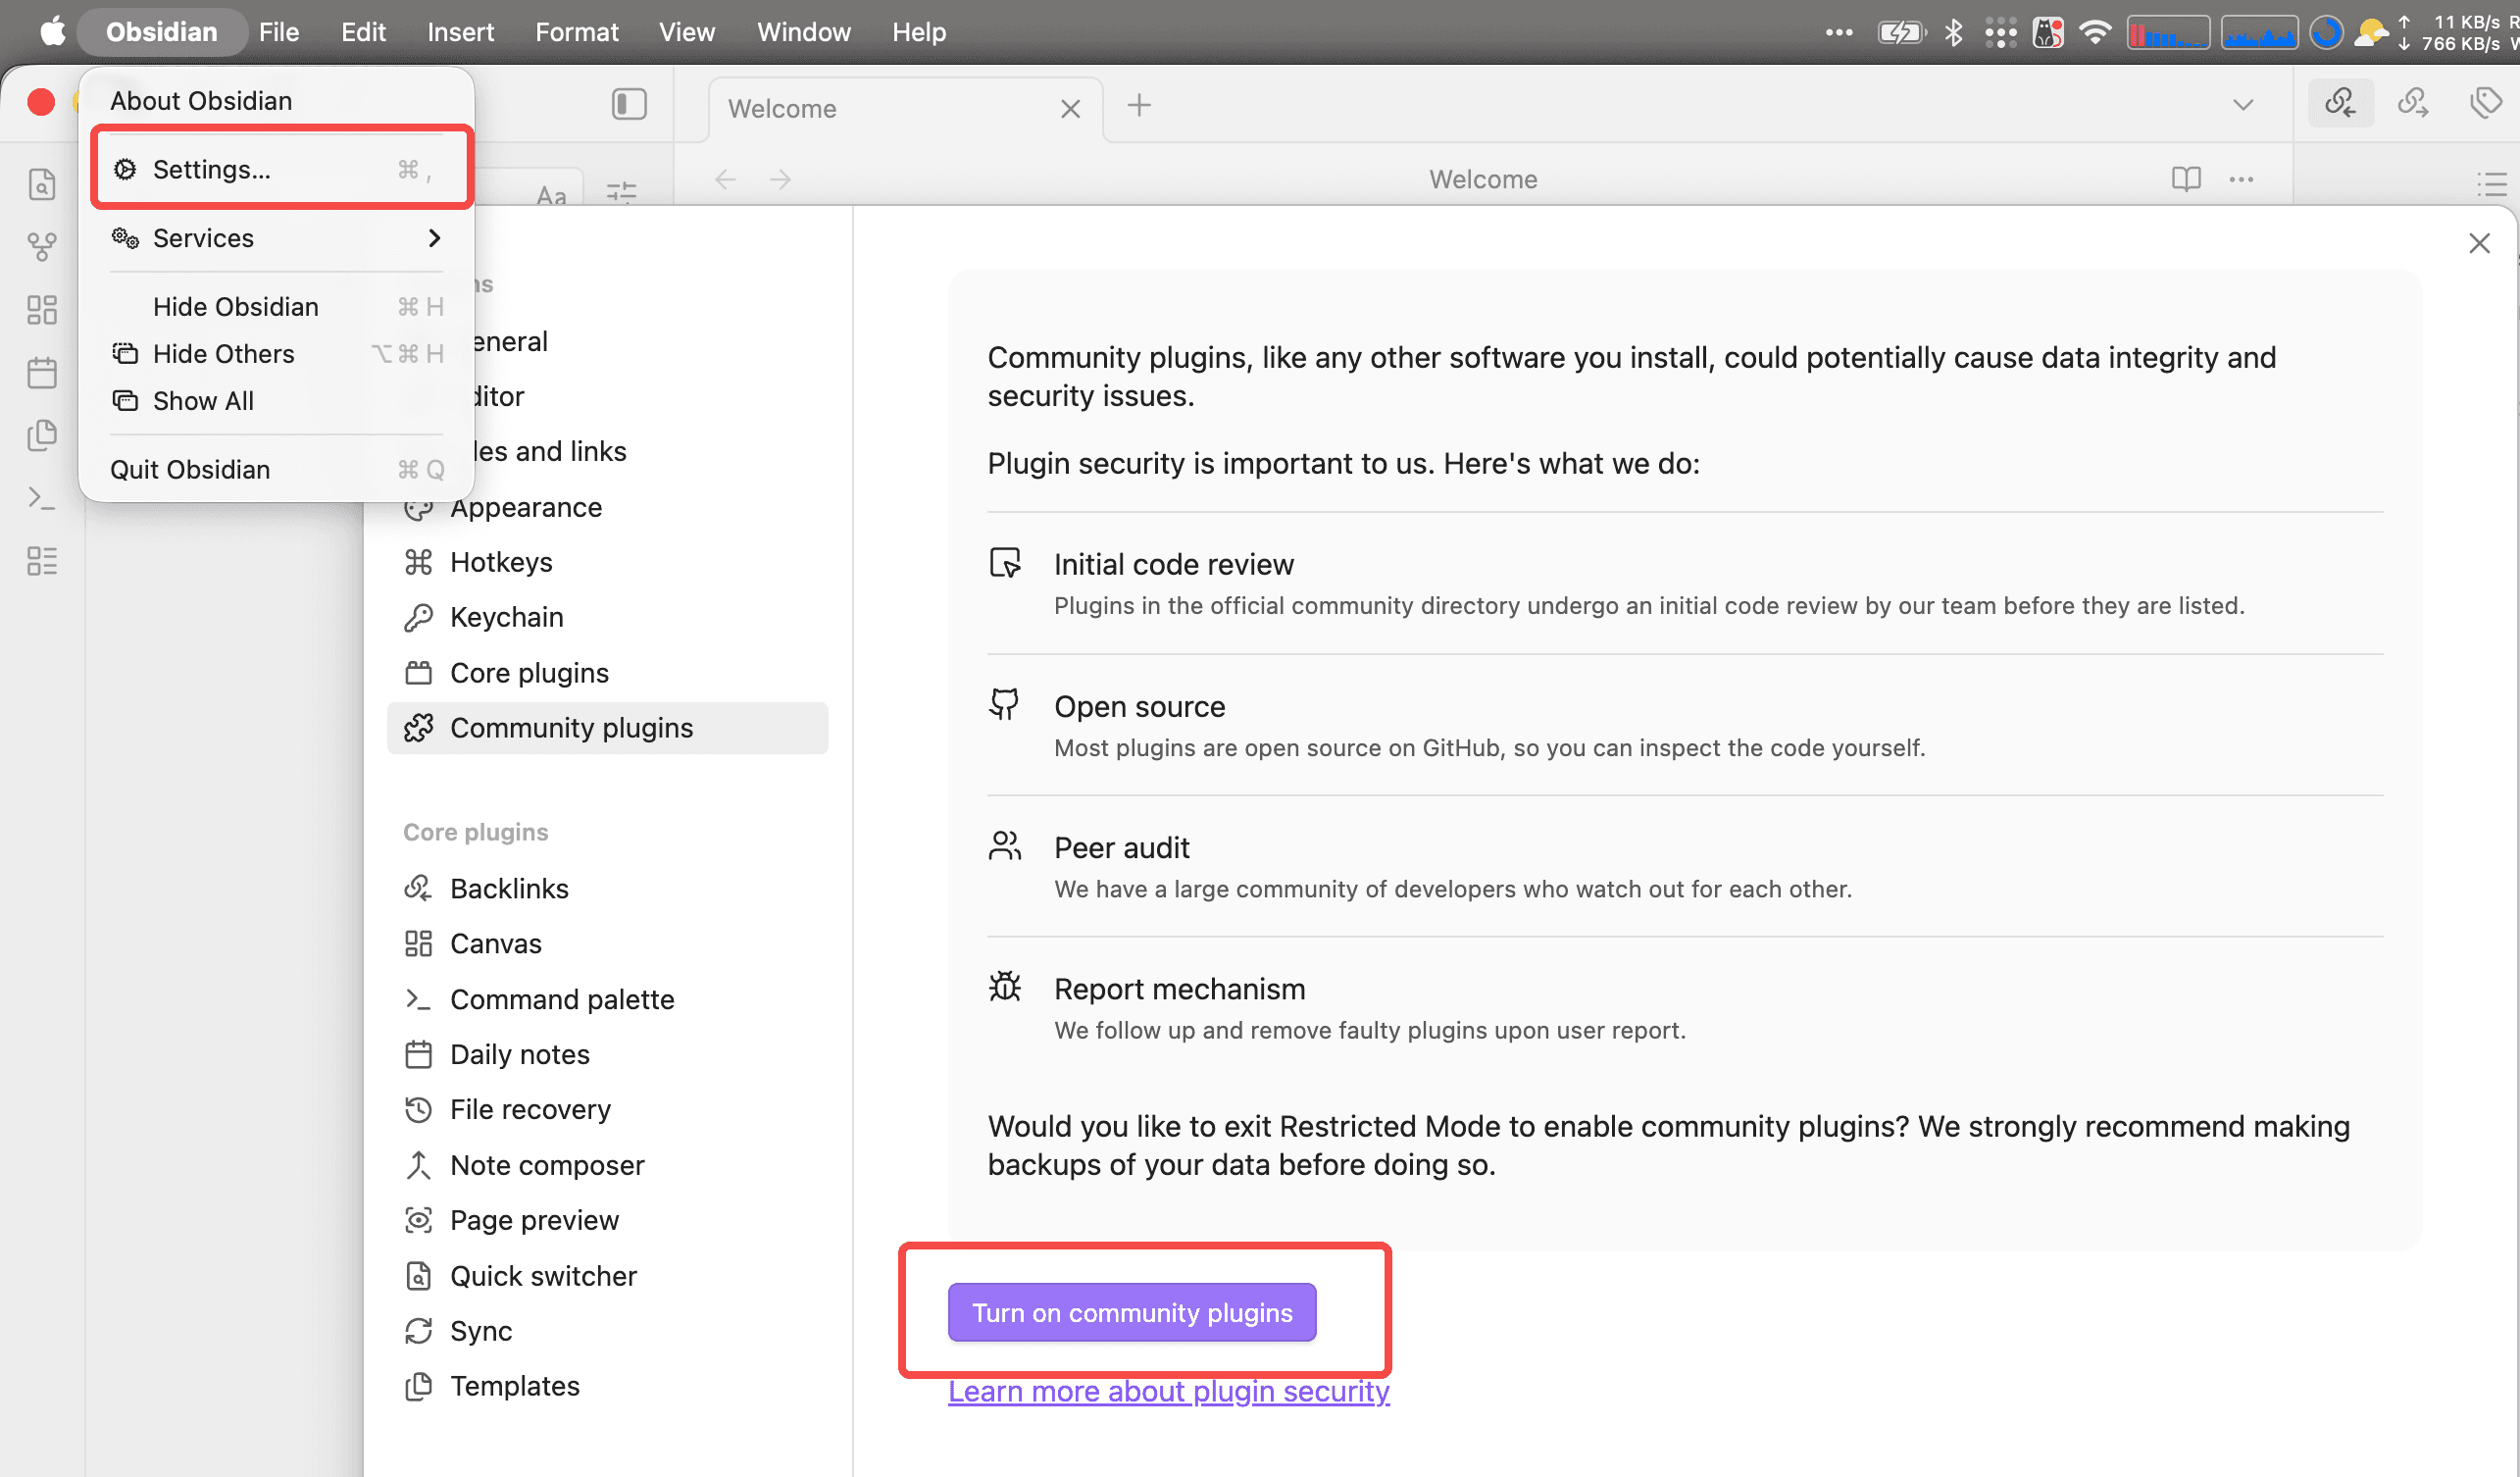
Open Obsidian → the top-left menu Obsidian → Settings (or the shortcut Cmd/Ctrl + ,), go to Community plugins, and click Turn on community plugins:
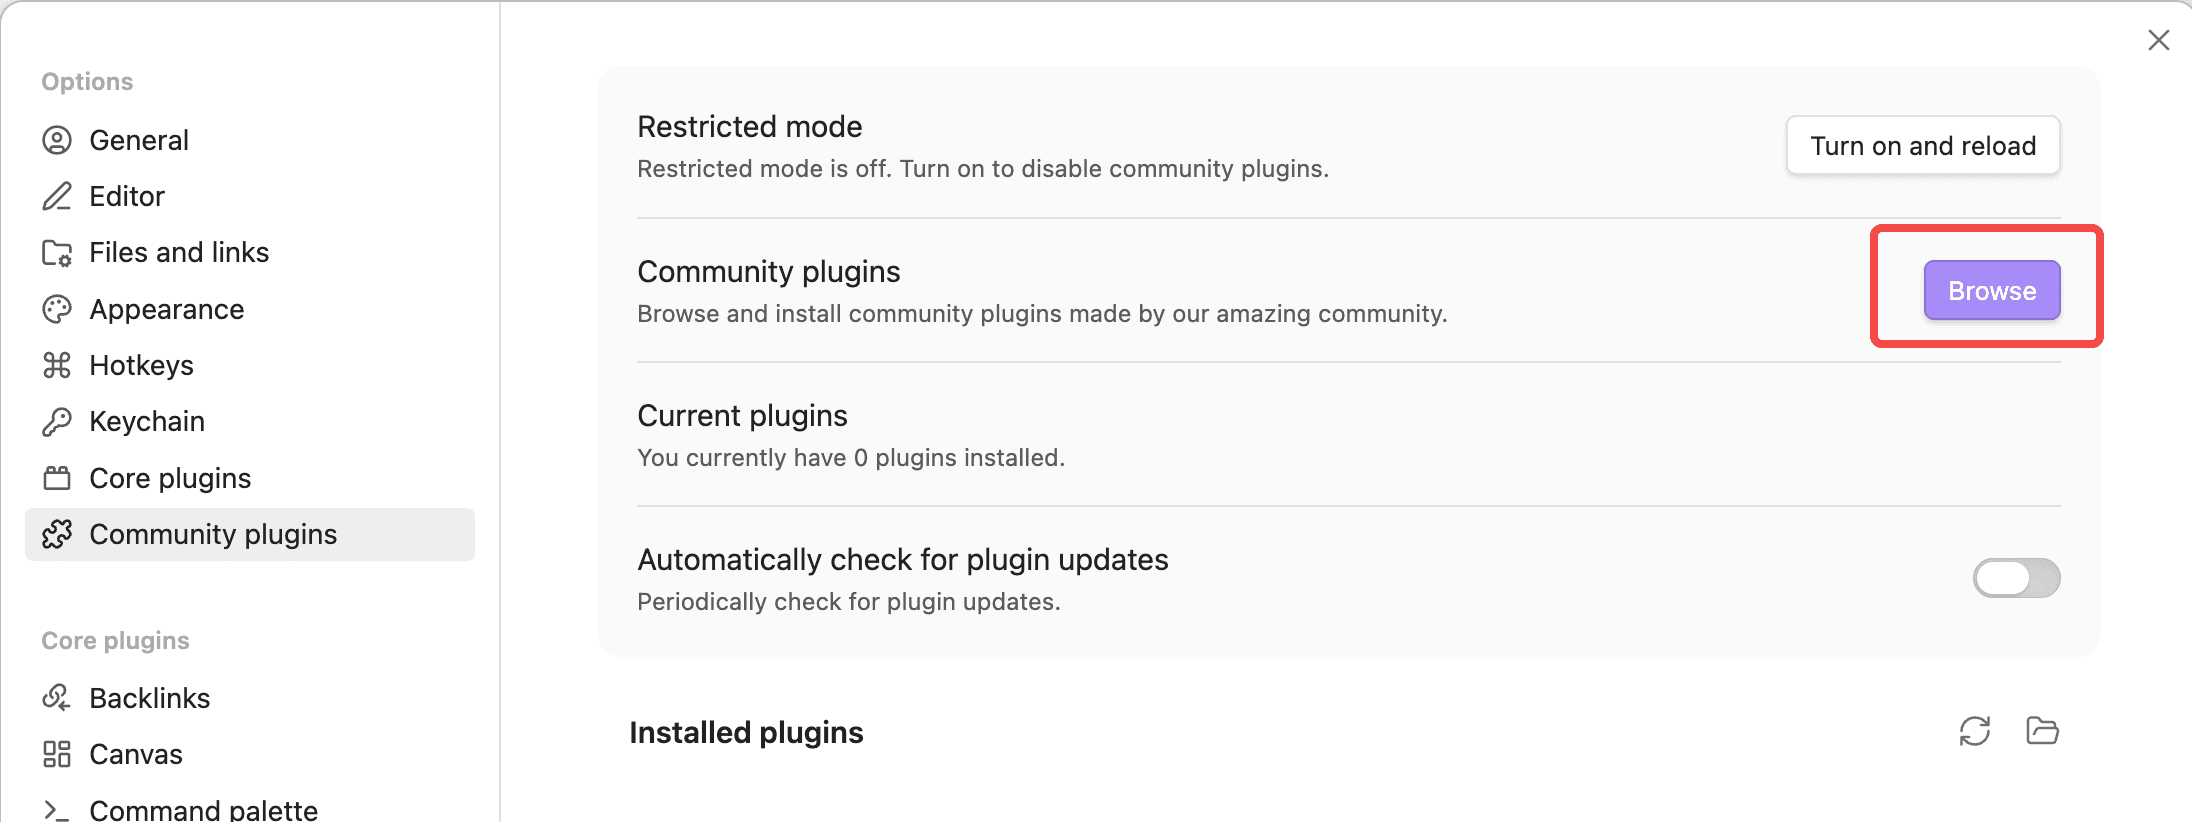
Once enabled, click the Browse button on the right of the Community plugins page to open the plugin marketplace:
Claudian plugin: use the Claude API in Obsidian
Claudian embeds AI coding agents like Claude Code and Codex into the Obsidian sidebar. Your entire vault becomes the agent's working directory, with support for file read/write, search, @mention, slash commands, and more.
Claudian's Claude mode calls the Claude Code CLI under the hood, so install that command-line tool first, then connect to the LMU AI API using either method below.
Step 1 — Install the Claude Code CLI
Claudian calls the local claude command, so you need to install the Claude Code CLI first: after installing Node.js, run npm install -g @anthropic-ai/claude-code (for detailed steps, see the Claude Code CLI configuration guide).
This step only covers installation; the LMU AI API is configured in Step 3.
Step 2 — Install the Claudian plugin
In the plugin marketplace (Browse), search for Claudian, click Install, and then click Enable once installation finishes.
Can't find Claudian?
If the marketplace does not list Claudian yet, you can install it from GitHub via the BRAT plugin: first install and enable Obsidian42 - BRAT from Browse, then run the command BRAT: Add a beta plugin for testing and enter the repository URL https://github.com/YishenTu/claudian.
Step 3 — Configure the LMU AI API (pick one)
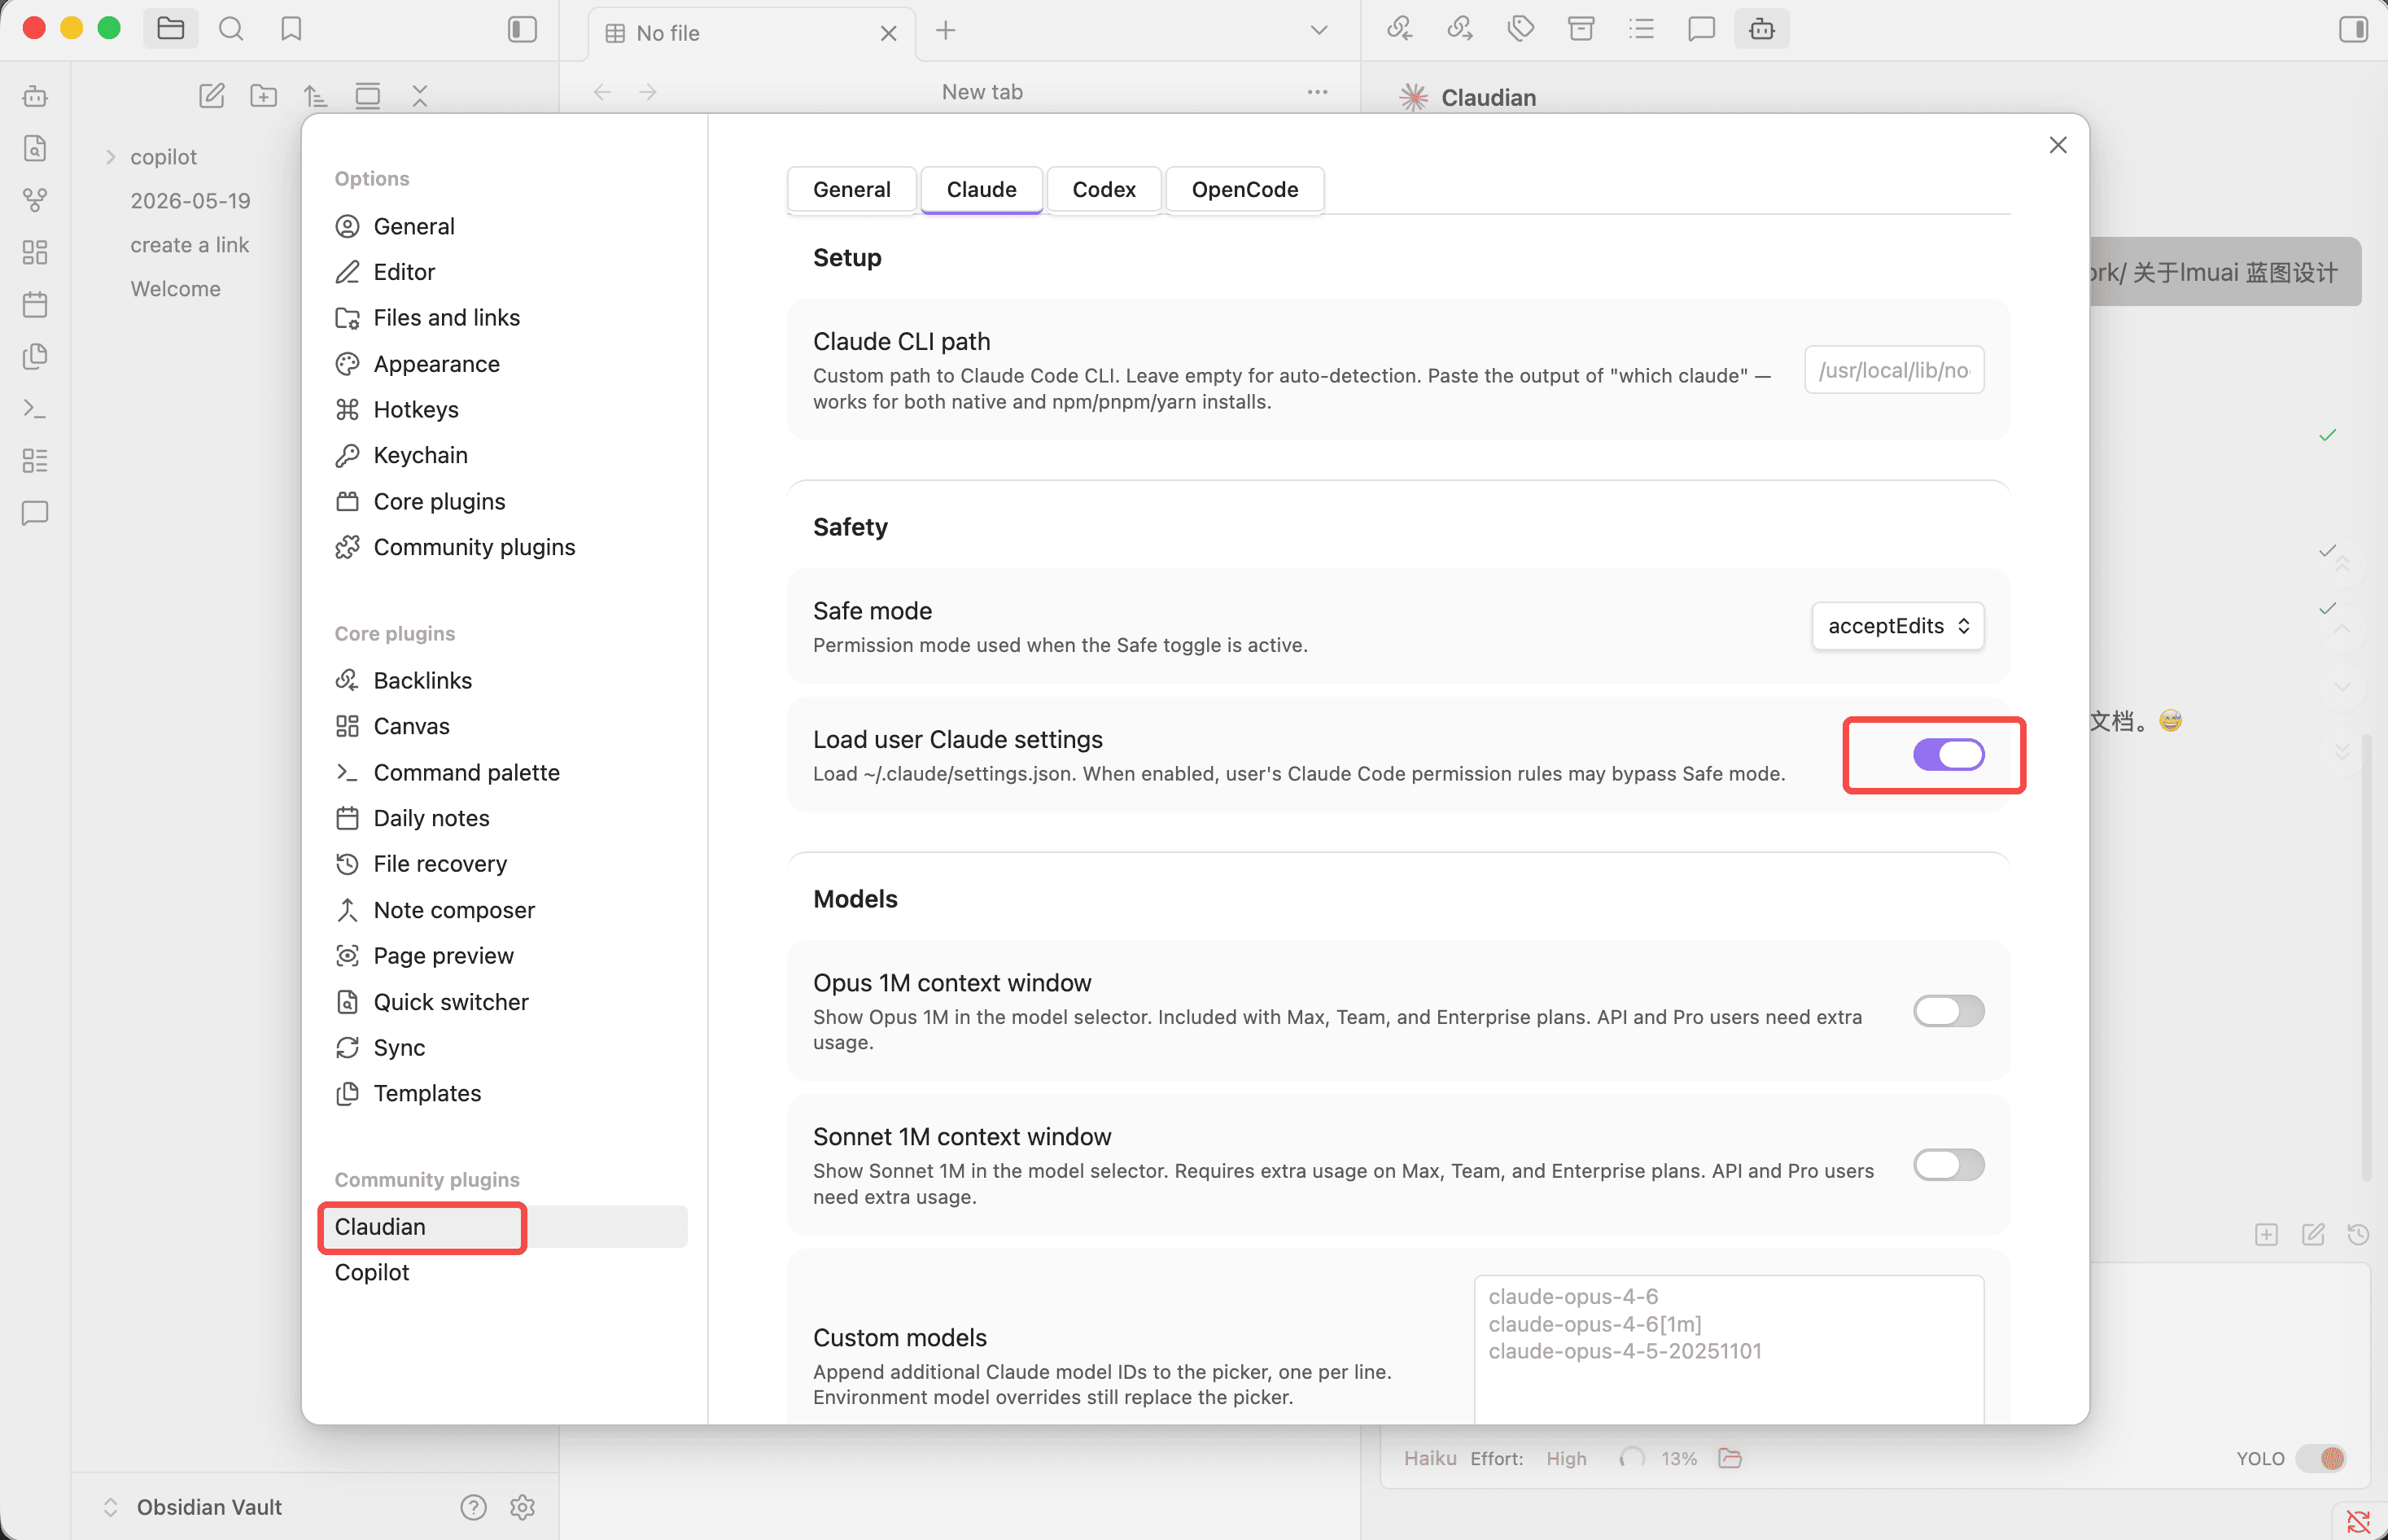
Go to the Settings → Claudian → Claude tab and enter the LMU AI Base URL and key using either of the methods below.
Best for users who have already configured the Claude Code CLI. First, write the LMU AI config into ~/.claude/settings.json:
{
  "env": {
    "ANTHROPIC_BASE_URL": "https://api.lmuai.com",
    "ANTHROPIC_AUTH_TOKEN": "sk-your-lmu-ai-api-key",
    "API_TIMEOUT_MS": "3000000",
    "CLAUDE_CODE_ATTRIBUTION_HEADER": "0"
  }
}
Then turn on the Load user Claude settings toggle in the Claude tab, and Claudian will load that file so the Base URL, key, and model settings all take effect.
No need to create ~/.claude/settings.json — enter the environment variables directly in the plugin settings.
In the Claude tab, scroll down to the Environment section and paste the following line by line into the Custom variables box (replace the key with your own):
ANTHROPIC_BASE_URL: https://api.lmuai.com
ANTHROPIC_AUTH_TOKEN: sk-your-lmu-ai-api-key
ANTHROPIC_MODEL: claude-haiku-4-5
CLAUDE_CODE_USE_BEDROCK=1
CLAUDE_CODE_ATTRIBUTION_HEADER: 0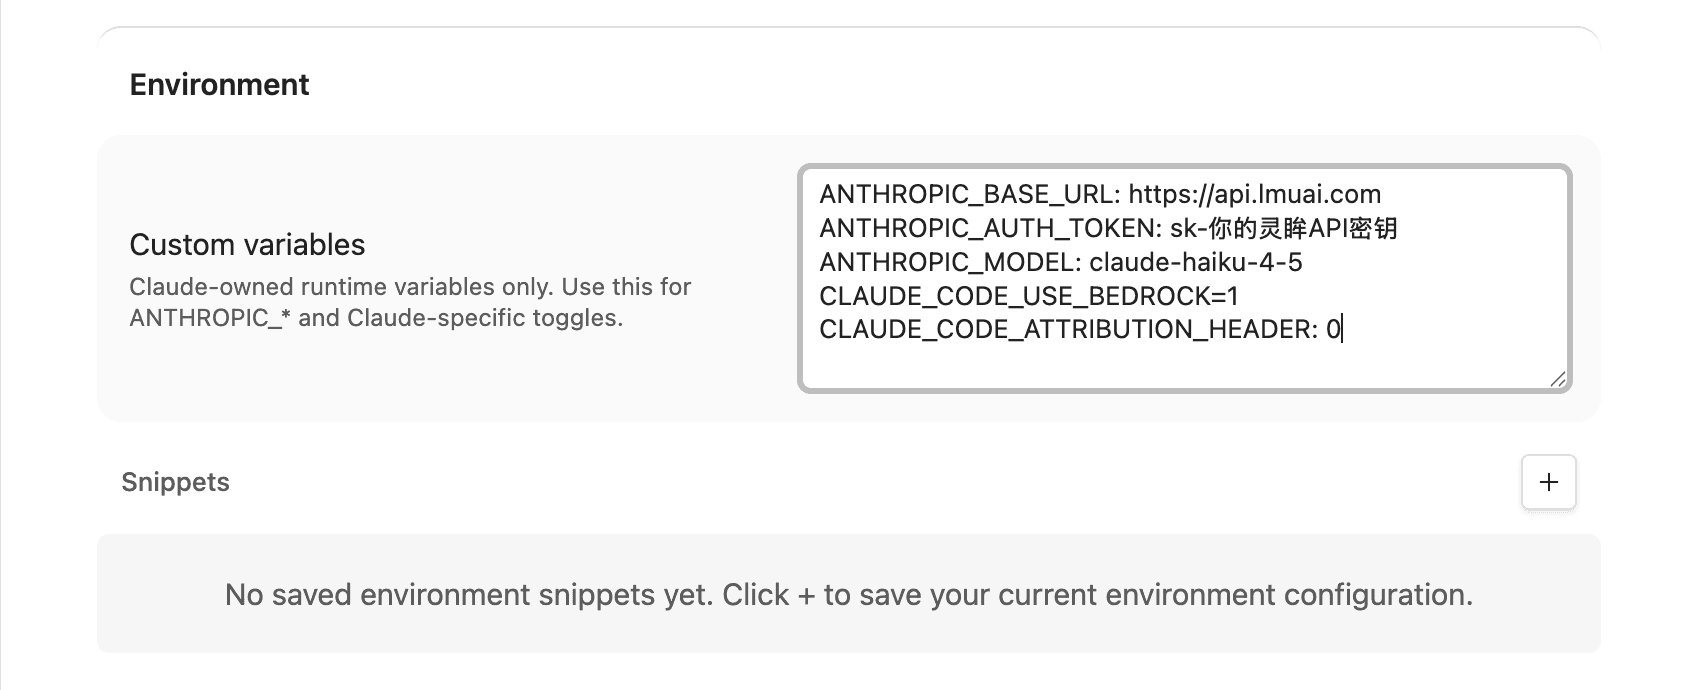
ANTHROPIC_MODELis the default model; you can replace it with another LMU AI model ID- This method does not require turning on Load user Claude settings
- Click the + next to Snippets to save the current environment variables as a snapshot for easy switching later
Other optional settings:
| Setting | Description |
|---|---|
| Claude CLI path | Leave blank for auto-detection. If you see Claude CLI not found, run which claude in your terminal (use where claude on Windows) and paste in the path it outputs |
| Safe mode | The permission mode; keep it at acceptEdits (recommended) |
| Custom models | Add LMU AI model IDs one per line so they appear in the model picker, e.g. qwen3.8-max-preview, claude-opus-5 |
Step 4 — Start using it
Click the Claudian icon in the left sidebar (or use the command palette) to open the chat sidebar; pick a model at the bottom, and you can chat with the AI next to your notes and have it read and write documents in your vault:
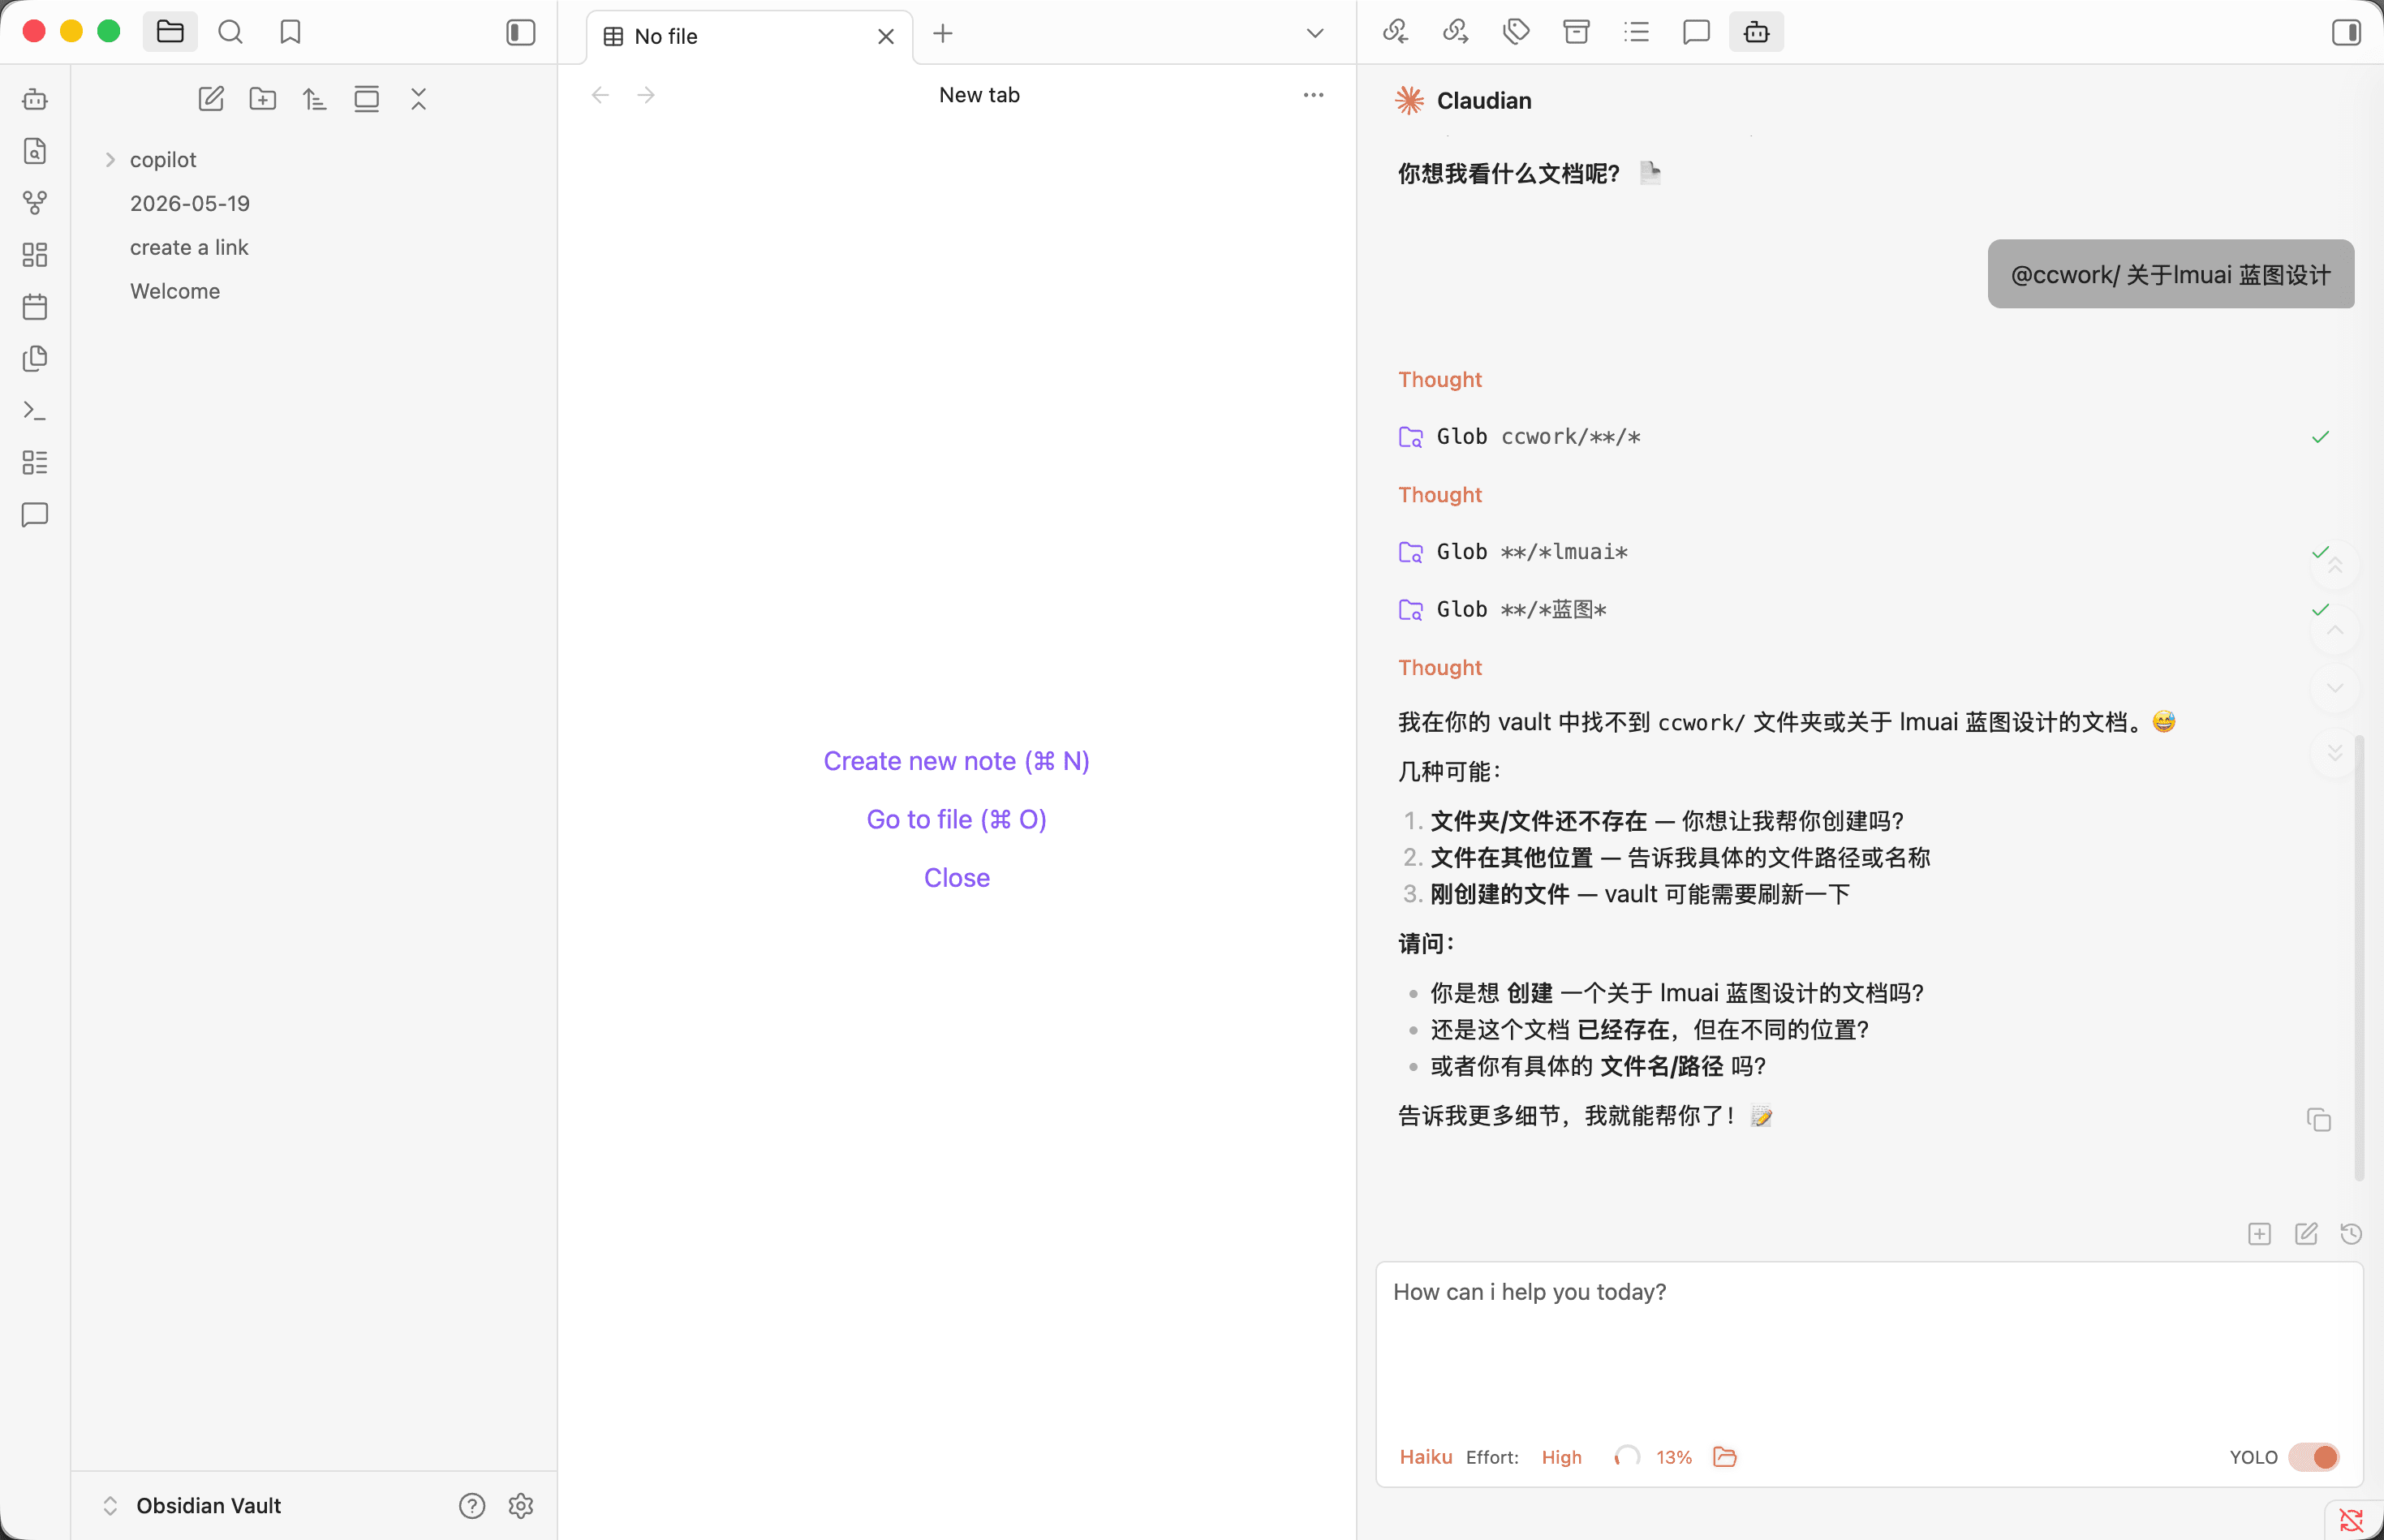
Using Chinese models
LMU AI supports Chinese models like Qwen, DeepSeek, and GLM. Switch by putting the model ID into the Step 3 config: for Method A, add "model": "qwen3.6-plus" to settings.json; for Method B, change the value of ANTHROPIC_MODEL. Adding model IDs one per line under Custom models also makes them appear in the model picker. See the full list of model IDs in the Model Gallery.
Copilot plugin: use the Claude API in Obsidian
Copilot is the most popular AI assistant plugin for Obsidian, supporting chat, knowledge-base Q&A, note summarization, and more. It lets you add custom models and connects directly to the LMU AI API without installing any command-line tool.
Step 1 — Install the Copilot plugin
In the plugin marketplace (Browse), search for Copilot and choose the Copilot by Logan Yang (the first result), then click Install and Enable:
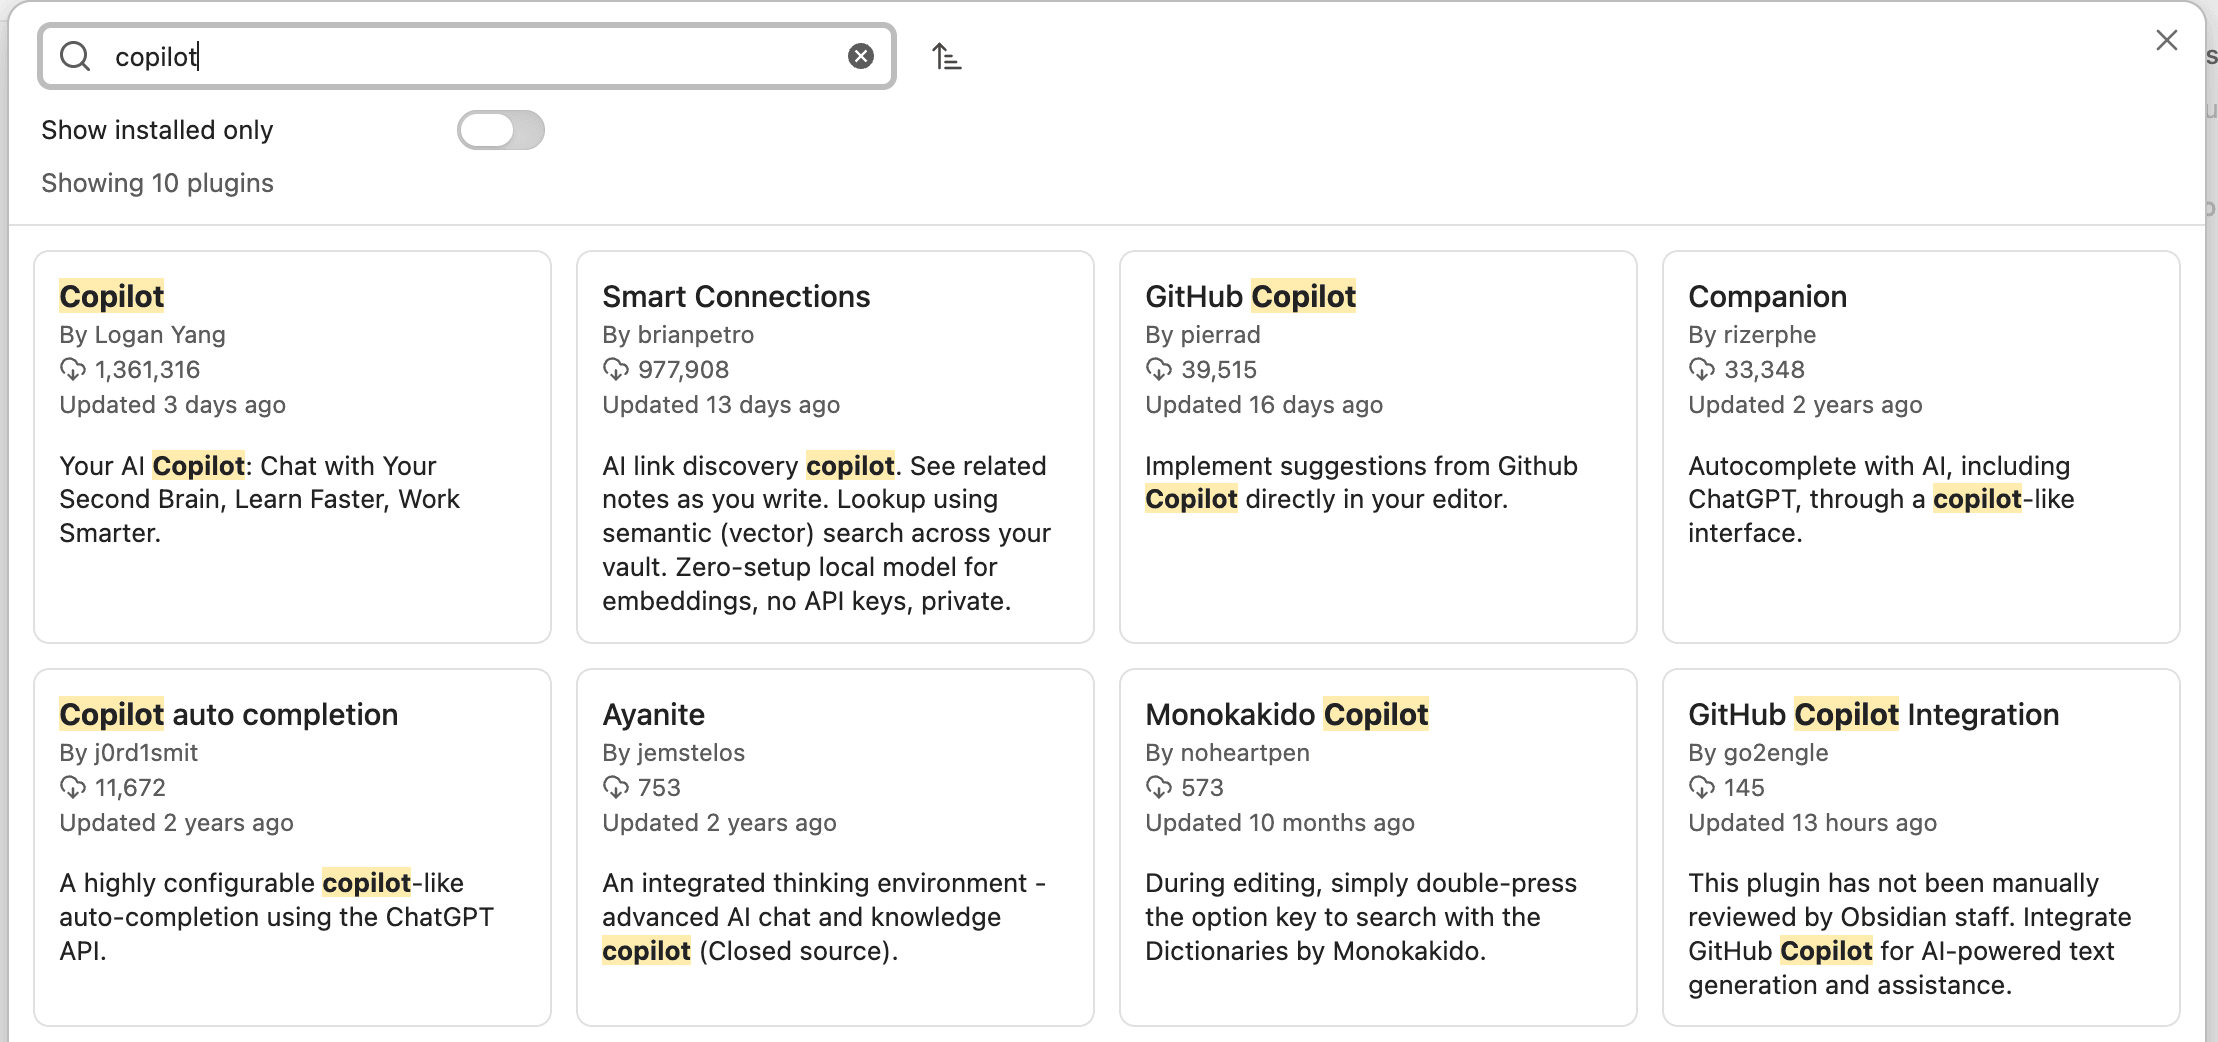
Step 2 — Add a custom model
Go to the Settings → Copilot → Model tab and click + Add Model in the top-right corner:
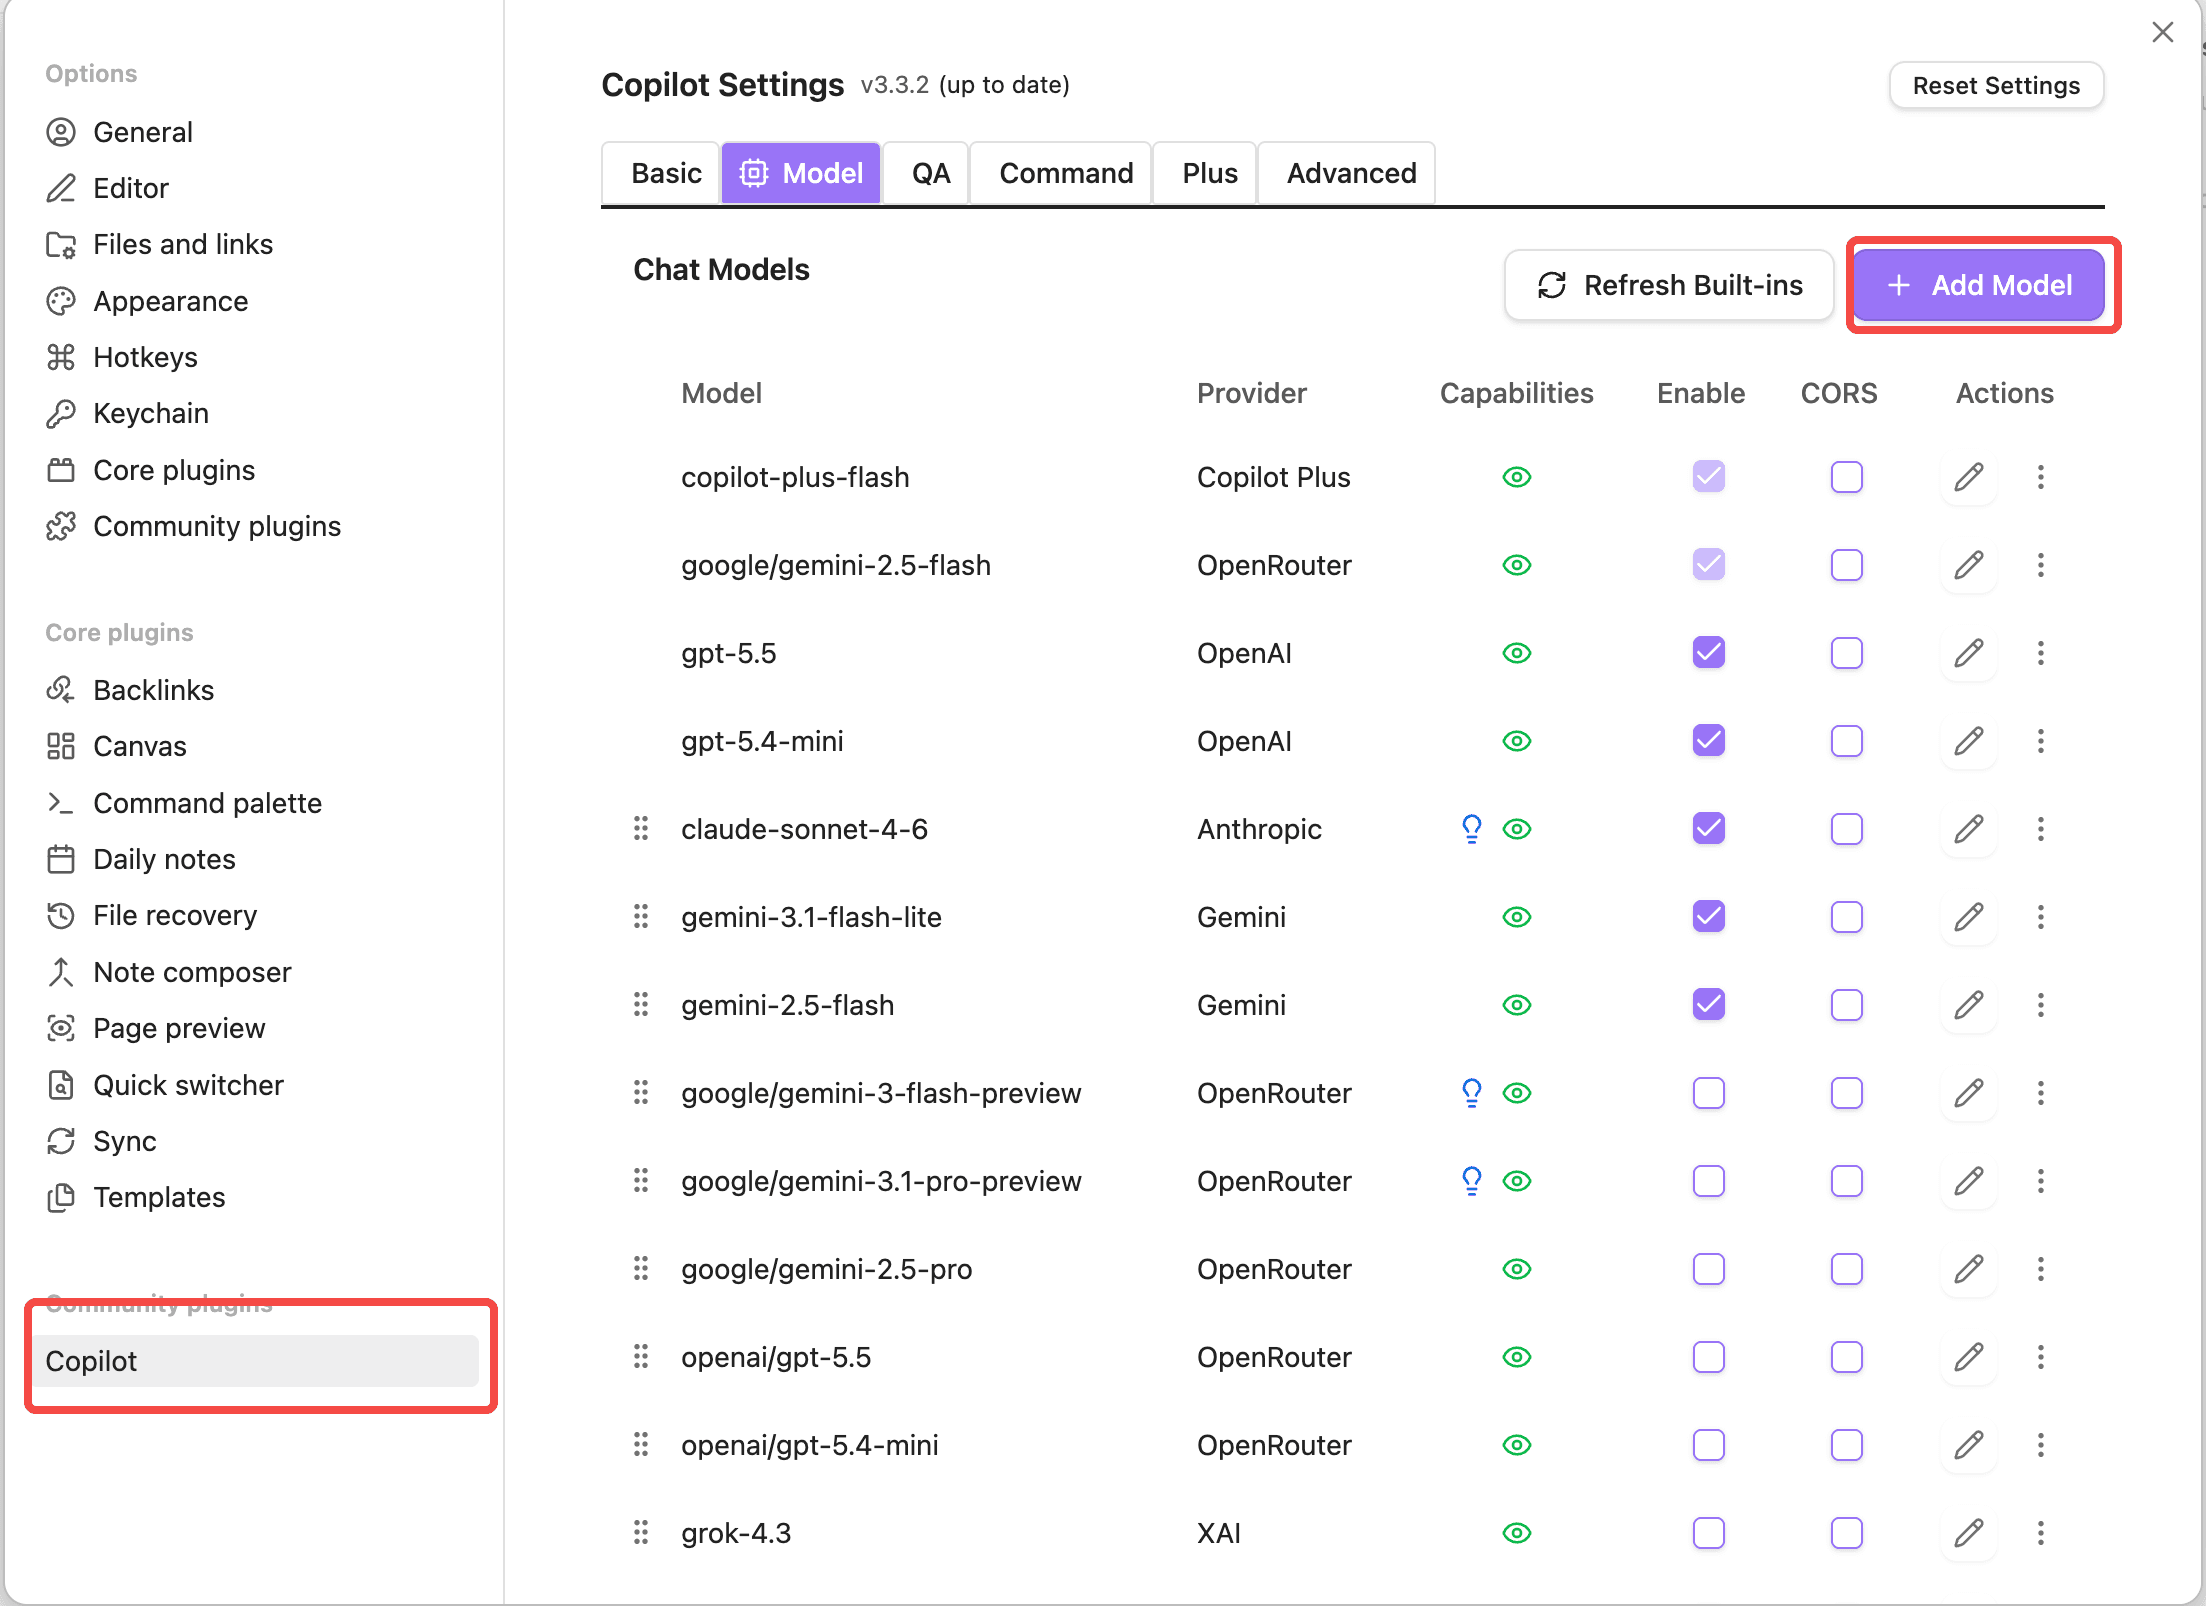
Fill in the following in the Add Custom Chat Model dialog:
| Field | Value |
|---|---|
| Model Name | an LMU AI model ID, e.g. claude-sonnet-5 |
| Display Name | the display name; can be the same as Model Name |
| Provider | choose Anthropic |
| Base URL | https://api.lmuai.com |
| API Key | the sk- key generated in the LMU AI console |
| Model Capabilities | check according to the model's capabilities; for the Claude series you can check Reasoning |
When done, click Test to verify; a green checkmark means the connection succeeded, then click Add Model to save:
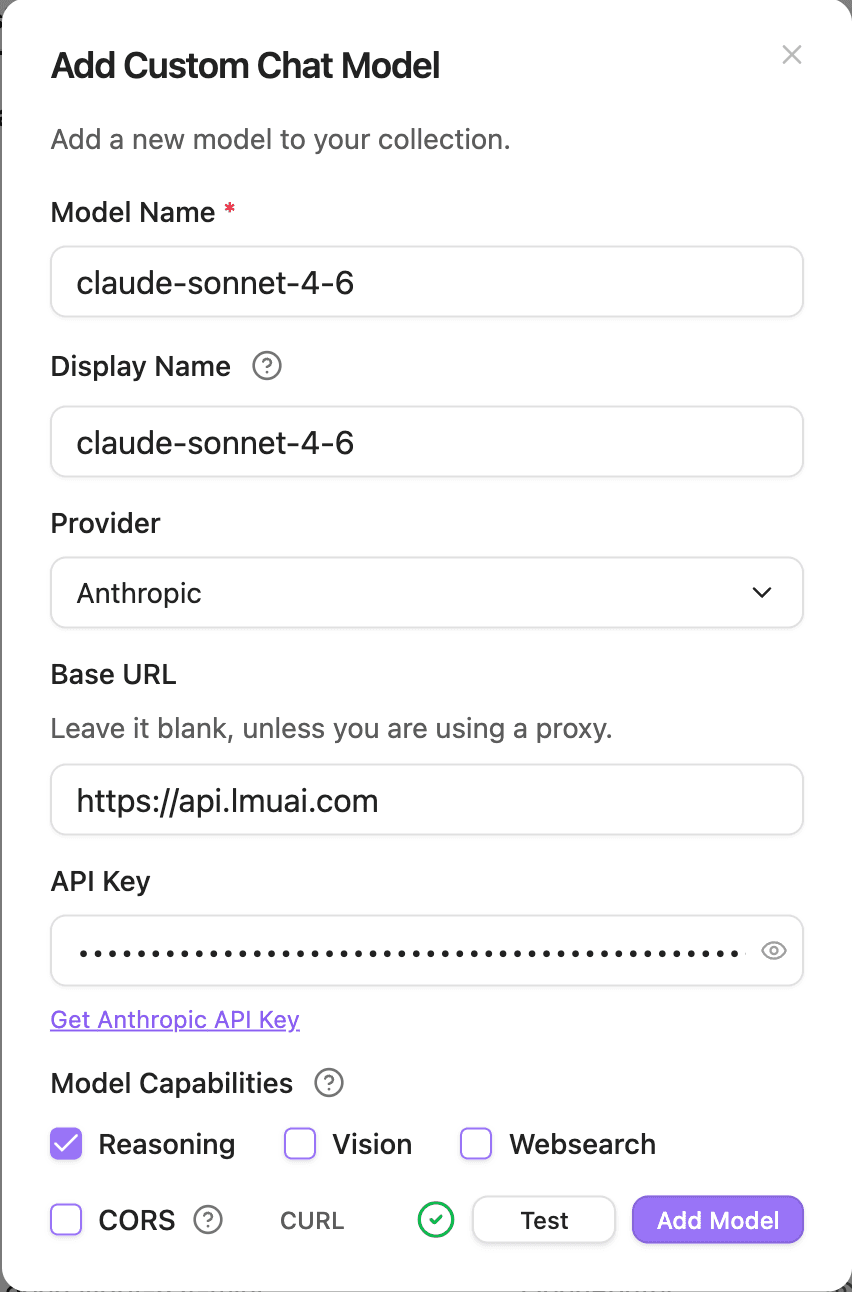
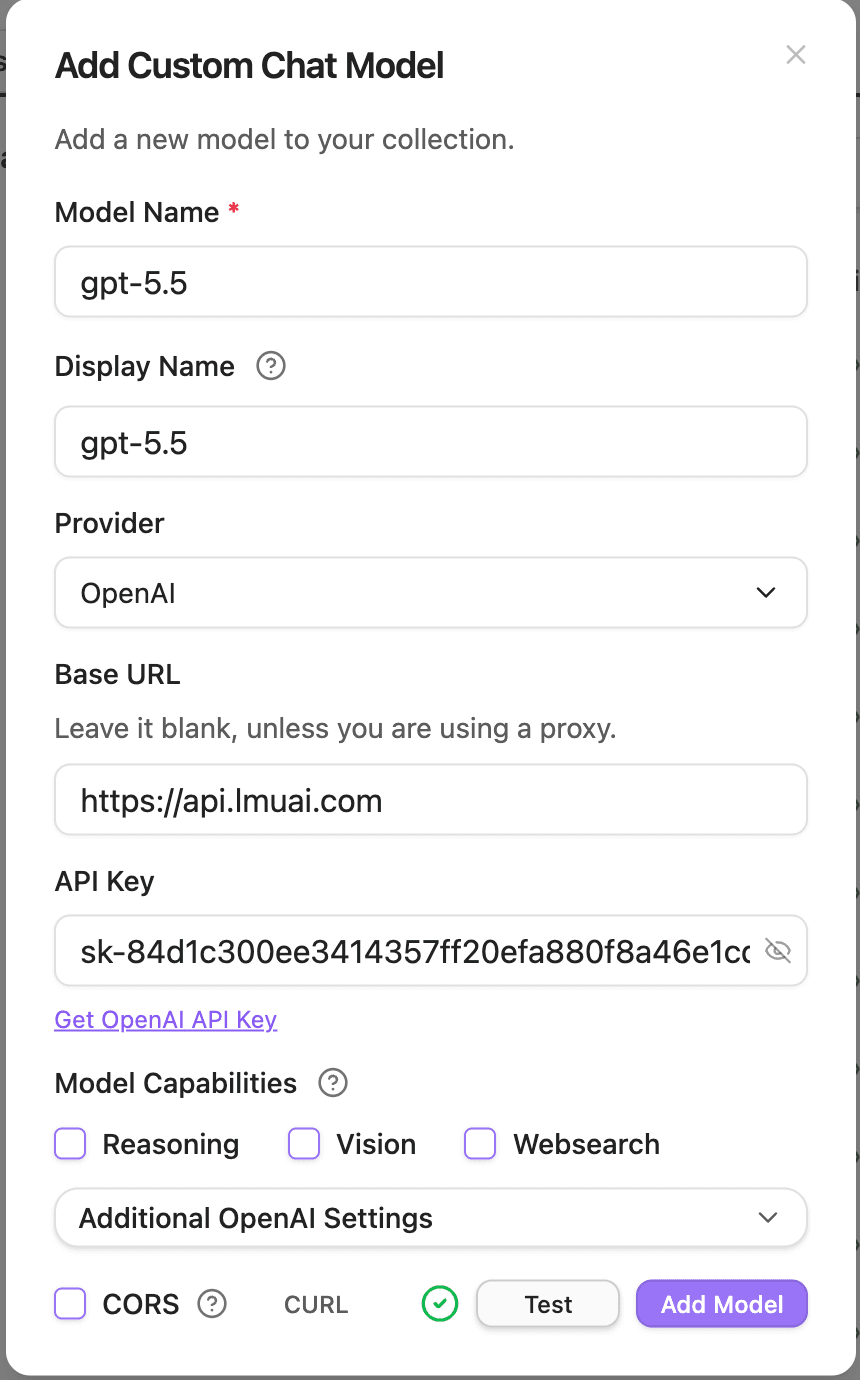
Step 3 — Add an OpenAI model (optional)
To use GPT-series models, click + Add Model again, change Provider to OpenAI, and fill in the rest the same way:
| Field | Value |
|---|---|
| Model Name | an OpenAI model ID, e.g. gpt-5.6-sol |
| Provider | choose OpenAI |
| Base URL | https://api.lmuai.com |
| API Key | the sk- key generated in the LMU AI console |
Step 4 — Select a model and start using it
Open the Copilot chat panel, pick the model you just added from the model dropdown at the top, and you can start chatting and asking questions about your notes.
Where do I find model IDs?
Model Name must be an exact model ID that LMU AI supports. Go to the Model Gallery to see all available models and copy them with one click.
Common issues
401 / Unauthorized error
The API key is wrong, or requests are still going to the official endpoint. Please confirm:
- Claudian: check that the
ANTHROPIC_AUTH_TOKENyou entered in Step 3 is your LMU AI key; for Method A, also confirm it isn't overridden by a shell environment variable (see Claude Code common issues for how to check) - Copilot: the Base URL is
https://api.lmuai.comand the API Key is your LMU AIsk-key, not an official Anthropic / OpenAI key
CORS error when adding a model in Copilot
In the Add Custom Chat Model dialog, check the CORS option before clicking Test to bypass the browser's cross-origin restriction.
Claudian reports Claude CLI not found
The plugin could not locate Claude Code automatically. Run which claude in your terminal (use where claude on Windows) and paste the path it outputs into Settings → Claudian → Claude → Claude CLI path.
Response timeouts or dropped streams
- Make sure
API_TIMEOUT_MSis set to3000000to avoid timeouts on long tasks - Turn off any VPN / proxy / system proxy — LMU AI is a direct domestic connection, and a direct connection is the fastest and most stable
Last updated:
Get an LMU AI key and start using Claude, Codex and more
Free sign-up, flexible plans, one key across Claude Code, Codex CLI, Cursor, VS Code, OpenCode, Cherry Studio and other AI tools.
Sign upIDEA Kilo Code
Connect to the LMU AI API with the Kilo Code plugin in IntelliJ IDEA — Claude uses the Anthropic protocol, GPT uses the Responses protocol.
Gemini Image API
Use LMU AI's native Gemini v1beta endpoint for text-to-image, image editing, and image-to-image, with 1K / 2K / 4K, common aspect ratios, and Base64 parsing.