Codex CLI (Windows)
Install and configure the Codex CLI on Windows to connect to the LMU AI API, including how to enable the 1M-token long context in config.toml.
After installing the Codex CLI, create two config files by hand (config.toml + auth.json) to connect to the LMU AI API — no third-party config tool needed.
Step 1 — Install Windows Terminal
On Windows, we recommend using Windows Terminal instead of CMD for the Codex CLI — it supports multiple windows and is more convenient.
- China cloud-drive download (recommended, fast): https://www.ilanzou.com/s/MzWnpE05
- GitHub download: https://github.com/microsoft/terminal/releases/tag/v1.23.20211.0
Download Microsoft.WindowsTerminal_1.23.20211.0_x64.zip, unzip it, and double-click WindowsTerminal.exe to launch — it's a good idea to create a desktop shortcut.
Step 2 — Install Node.js
If it's already installed you can skip this; check with:
node -v
You need Node.js 20+ — download: https://nodejs.org/en/download
During installation, be sure to check "Automatically install the necessary tools".
After installation, verify in the terminal:
node -v
# A version number (e.g. v24.4.1) means it installed correctly
Special case
If node.js isn't installed, or you installed it before but the environment is misconfigured, download and reinstall it once, then reopen the terminal.
If you hit a script-execution-blocked error, run the following command:
Set-ExecutionPolicy RemoteSigned -Scope CurrentUserStep 3 — Install the Codex CLI
npm i -g @openai/codexIf you hit network issues, switch to a China mirror first, then install:
npm config set registry https://registry.npmmirror.com
npm i -g @openai/codex
Verify the install:
codex --version
# A version number means it installed correctly
Step 4 — Create the config files
The config directory is C:\users\your-username\.codex\ (create it if missing; overwrite any old files). Create/overwrite these two files in it:
config.toml
model = "gpt-5.4"
model_reasoning_effort = "xhigh"
disable_response_storage = true
sandbox_mode = "danger-full-access"
windows_wsl_setup_acknowledged = true
approval_policy = "never"
file_opener = "vscode"
model_provider = "codex"
web_search = "cached"
suppress_unstable_features_warning = true

[history]
persistence = "save-all"

[tui]
notifications = true

[shell_environment_policy]
inherit = "all"
ignore_default_excludes = false

[sandbox_workspace_write]
network_access = true

[features]
plan_tool = true
apply_patch_freeform = true
view_image_tool = true
unified_exec = false
streamable_shell = false
rmcp_client = true
elevated_windows_sandbox = true

[profiles.auto-max]
approval_policy = "never"
sandbox_mode = "workspace-write"

[profiles.review]
approval_policy = "on-request"
sandbox_mode = "workspace-write"

[notice]
hide_gpt5_1_migration_prompt = true

[model_providers.codex]
name = "codex"
base_url = "https://api.lmuai.com"
wire_api = "responses"
requires_openai_auth = true
auth.json
{
  "OPENAI_API_KEY": "your sk- key generated in the console"
}
Step 5 — Launch the Codex CLI
After saving the config files, reopen the terminal and run the following to launch and sign in automatically:
codex --dangerously-bypass-approvals-and-sandboxOr the short form:
codex --yoloThis launch command skips security approvals, so you do not approve each auto-executed step.
On a successful launch, the interface shows the current model as gpt-5.4 xhigh (the model set by the model field in config.toml).
Enabling the 1M context in Codex (optional)
gpt-5.4 supports a 1M-token long context window (only 272K by default), useful for reviewing very large repos, analyzing long logs, refactoring across multiple files, and similar tasks. Codex does not enable the 1M window by default; you must declare it explicitly in config.toml.
How to configure: add two lines to config.toml
Edit C:\users\your-username\.codex\config.toml and add the following at the top level (before any [section], e.g. right after model = "gpt-5.4"):
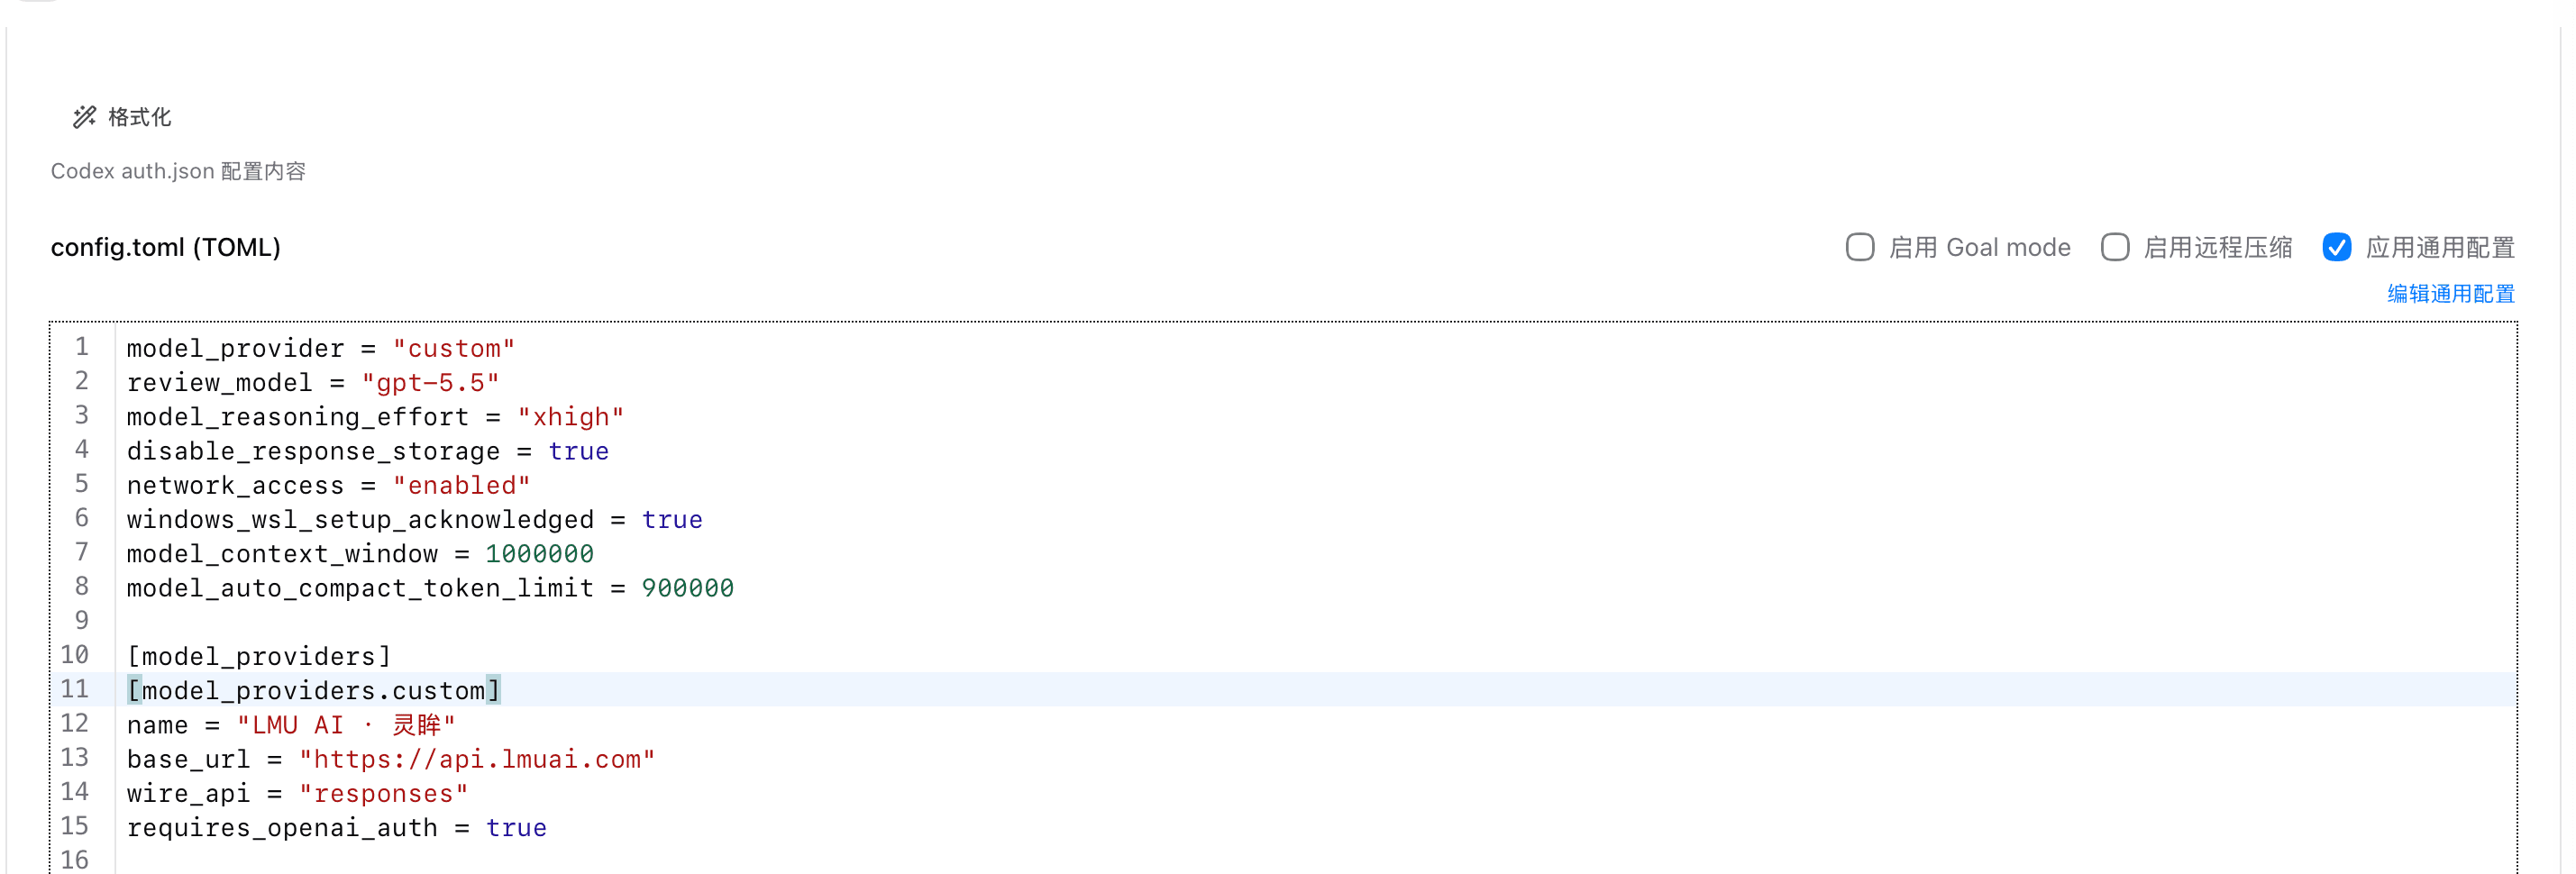
model_context_window = 1000000
model_auto_compact_token_limit = 900000
Save, reopen the terminal, and re-enter Codex to apply it.
Field reference
| Field | Purpose |
|---|---|
model_context_window | Declares the model's usable context window in tokens; 1000000 is 1M. Unset, it uses the model default (272K) |
model_auto_compact_token_limit | The token threshold that triggers auto-compaction of history (auto-compact); set it to about 90% of the window (900000 for 1M). Values above 90% of the window are clamped by Codex, so a larger number is pointless |
Verify it took effect
After re-entering Codex, type /status and check whether context window shows around 1M (some versions show about 950K — a reserved 5% safety margin from Codex). You can also use /statusline to add context usage to the status bar for live monitoring.
If you use CC Switch
If you manage the Codex config with CC Switch, add the same two lines in its Codex config editor and apply — the effect is identical:
Usage notes
- Must be at the top level: these two fields do not take effect inside a
[profiles.xxx]section (a known Codex limitation); also put them in the user-levelC:\users\your-username\.codex\config.toml, since a project-level.codex\config.tomlmay be ignored - Model support:
gpt-5.4andgpt-5.5support 1M over the API channel; models likegpt-5.3-codexare capped at 272K, and no config value can exceed the model's own limit - Higher cost: the longer the context, the more tokens each request uses; the portion above 272K is billed at the higher long-context tier, so don't leave it on except for very long tasks
- Version differences: some newer Codex versions read the window size from the model catalog first; if
/statusstill shows the old value, upgrade to the latest (npm i -g @openai/codex@latest) and retry
Last updated:
Get an LMU AI key and start using Claude, Codex and more
Free sign-up, flexible plans, one key across Claude Code, Codex CLI, Cursor, VS Code, OpenCode, Cherry Studio and other AI tools.
Sign upCodex CLI (Mac/Linux)
Install and configure the Codex CLI on Mac / Linux to connect to the LMU AI API, including how to enable the 1M-token long context in config.toml.
Codex CLI (Server)
Deploy the Codex CLI on a WSL2 or SSH server and connect to the LMU AI API: install Node 20 with volta, then write config.toml and auth.json in one command.